Configuring a Project Analysis
Before files can be analyzed, the project needs to be configured for an analysis. Configuration settings include auto-archiving, hybrid analysis, rule set associations, and so forth.
- Click the Project icon in the navigation bar to open the Projects page.
- Select a project and click the project's dropdown configuration icon and select Analysis Config.
- Refer to the information below to complete each section.

Analysis Configuration Options
- Archive (change status to gone) findings not seen in subsequent tool
inputs from the same tool
As files are analyzed with Software Risk Manager, each one is remembered as an analysis input. As more and more analyses are performed, the number of analysis inputs can become very large. The Auto-Archival setting controls how old analysis inputs are handled.
By default, auto-archival is enabled. As new inputs are analyzed, old inputs of the same type will be archived. For example, two analyses are performed in series on a project, both supplying a SpotBugs results file. In this scenario, the SpotBugs results file provided for the second analysis is perceived as "newer," so it will replace the SpotBugs results from the first analysis. The analysis input for SpotBugs results in the first analysis will be archived. Any findings that were present in the first file but not the second will have their statuses changed to Gone as a part of this process.
With auto-archival disabled, the two SpotBugs result files will both remain present. This can be useful if you wish to provide one SpotBugs results file for a part of your application, but a different SpotBugs results file for a different part of your application. Both files may be analyzed without interfering with each other. However, keep in mind that without manual management of the analysis inputs, inputs will begin to pile up, potentially degrading the performance of filters and other interactions. Note: You can manually archive old inputs from the Analysis Inputs List.
- Allow gone findings to be reopened
If the Allow gone findings to be reopened option is checked, then findings will be reused and have their status set to Reopened if they reappear later at the same location. With this option disabled, a new finding will be created instead.
- Reopen resolved findings when updated
If the Reopen resolved findings when updated option is checked, then findings set to a resolved status (i.e., Ignored, False Positive, Fixed, Mitigated) will have their status changed to Reopened if new data is brought in from a tool (not matching previously seen data). Findings set to Fixed will be changed to Reopened if reported, regardless of if the data is new or not (since this signals that the issue has not been fixed).
Analysis Correlation Options
- Prevent tool result correlation
If the Prevent tool result correlation option is checked, then multiple tool results will not be added to a finding. This will give you a separate finding for every issue reported by a tool. Tool results will still be associated with rules according to the selected Rule Set; however, when multiple instances of the same issue occur at the same location, they will not be merged.
- Enable hybrid analysis (causes longer analysis times)
If the Enable hybrid analysis option is checked, then additional steps will be performed during analysis to enable hybrid analysis. If you upload files that have Java Source or Java Binary files in them, Software Risk Manager will analyze the structure of these files (gathering information about their classes and methods), which will later be used to perform hybrid correlation. Note that this extra analysis is time-consuming; the larger the project, the longer the analysis. Because of this, the Enable hybrid analysis option is unchecked by default.
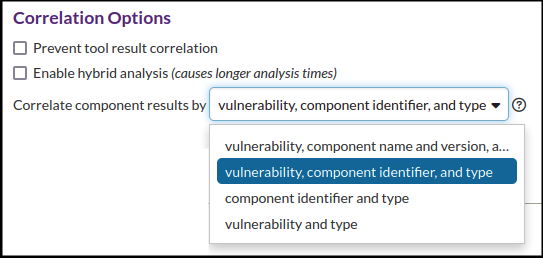
- Correlate component results by [mode]

Modes control how Software Component Analysis (SCA) tool results are correlated to findings (for more information, see Understanding Component Correlation). The options are as follows:- vulnerability, component name/version, and type
- vulnerability, component identifier, and type
- component identifier and type
- component name/version and type
- vulnerability and type
-
Exclude host when correlating infrastructure security-related findings
If the Exclude host option is checked, then host information will be excluded from the correlation criteria when processing security-related findings. This will produce one finding with tool results from all hosts for each applicable rule. When this option is not checked, one finding will be produced for each host for each applicable rule.
Rule Set Associations
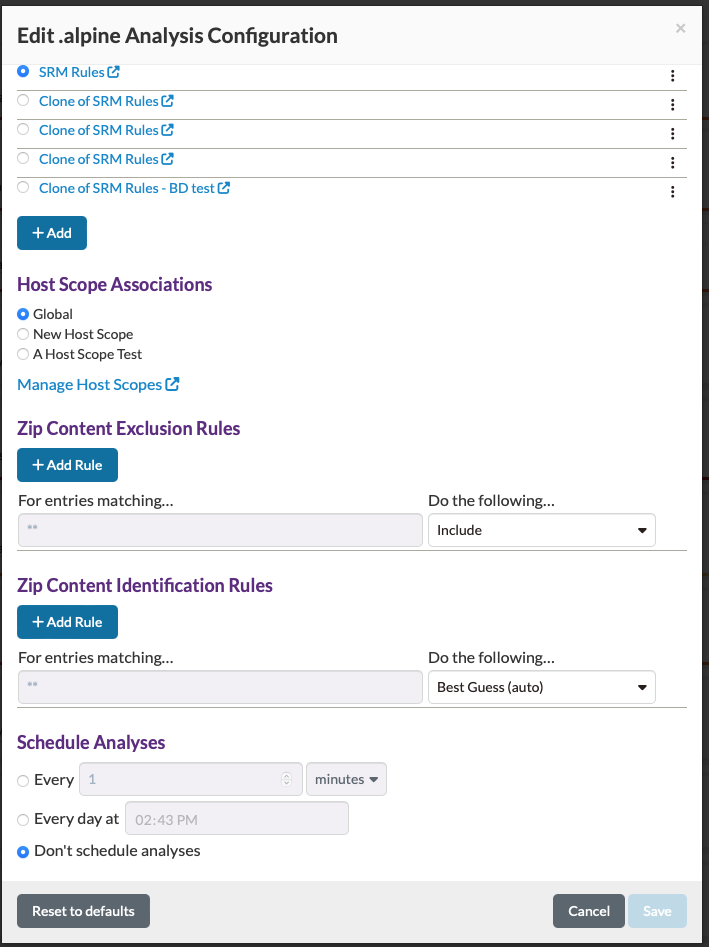
The Rule Set Associations section allows you to select the Rule Set that will be used to correlate similar tool results into Findings.
Three options are available:
- Don't use any rules
- SRM rules
- Clone of SRM rules
By default, new projects will use the built-in "Software Risk Manager Rules" set. The "Don't use any Rules" option is available if you don't want tool results to be mapped to rules. More information on Rule Sets can be found in the Rule Sets section of this guide.
Users with the admin role can use this section to manage Rule Sets
by creating, cloning, or deleting them.
Click the dropdown configuration icon to open, copy, or delete the Rule Set.
Adding a Rule Set using the Add button will initialize a blank Rule Set.
A cloned Rule Set will be initialized as a copy of the "parent" set. This can be useful if you want one project to use mostly the same correlation logic, but with a few alterations from another project. Note that the default Software Risk Manager Rules set is read-only.
To make modifications to a rule set, you need to create a clone first. Click the dropdown configuration icon and select Copy to create a clone, then make modifications to the clone.
To view or modify an existing Rule Set, click the dropdown configuration icon and select Open.
Reminder: When making changes in the Analysis Configuration window, make sure to click OK to save any changes.
Reminder 2: Since a project's configured Rule Set determines the manner in which results are correlated, changing that configuration necessitates an update of the correlation. This happens when the configured Rule Set for a project is modified in any way, or if the Analysis Configuration is changed to use a different Rule Set. When this happens, the Findings page will display a notification prompting users to do so.
Host Scope Associations
Host Scopes are sets of projects that share host information with each other. They allow the Host Normalization process to determine which hosts are actually the same hosts within a Host Scope. Selecting any of the Host Scopes in the associations list will associate the current project with that Host Scope, which implies that the current project's host information belongs to the selected Host Scope. Click the Manage Host Scopes link to open the Hosts page.

Input Content Rules
When a zip-like file (e.g. Zip, Jar, War, etc) is uploaded to a Software Risk Manager project, that project's Input Content Exclusion Rules and Input Content Identification Rules determine how entries in that zip file (and possibly entries in other zip-like files nested within the main zip file) will be treated by bundled tools using that file as input.
Exclusion Rules determine which zip entries will be ignored by bundled tools.
Identification Rules determine the perceived source of the zip entries, as either "library code" or "custom code" (third-party or first-party, respectively). Many tools will only be interested in custom code, and others (like component analysis tools) will only be interested in library code.
Proper configuration of these rules can drastically reduce the number of unwanted findings, for example, by avoiding analyzing files from a third-party library whose code you cannot directly modify.
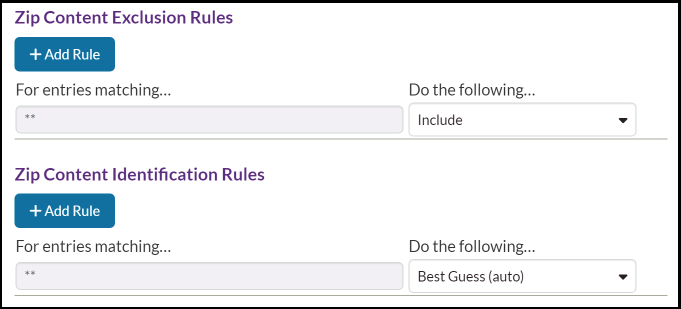
By default, all entries in a zip-like file will be included, and their role (library code or custom code) will be automatically guessed by Software Risk Manager.

The two Input Content Rule sections in the Analysis Configuration window share a common
format. Each row represents a rule, where files matching that rule's pattern will be
subject to the decision chosen from its respective dropdown menu. Later rules
(further down the list) take precedence over earlier rules. The first rule will
always use ** as its pattern, since it is the fallback for
all zip entries. Its pattern may not be changed, but its decision
may be changed. The patterns must be Glob Patterns, e.g., **.java matches
any .java file in any folder. Patterns should use forward slashes
(/) to denote directories instead of backslashes
(\), even on Windows.
The / button at the right of the pattern input can be clicked to add
a nested pattern that will apply to files nested in a zip-like file matched by the
first pattern. For example, in a project where a .war file is
typically uploaded, you could configure a pattern to match a particular
.jar file inside that .war file, then click
the / button to configure a pattern to match certain
.class files inside that particular .jar. To
undo adding a nested pattern, mouse over the > icon to the left of
its text input. The icon will become a delete button, which can be clicked to remove
the nested pattern.
To remove an entire rule, click the (-) icon to the right of the rule.
Input Content Exclusion Rules
Exclusion rules can be used to allow tools to completely ignore certain entries
in an uploaded zip file. A typical use-case for this is to avoid analyzing test
files. For example, entering src/test/java/**.java and
selecting "Exclude" will exclude all .java files in any
subdirectory of the src/test/java directory in the main zip
file. (Note that since there is no leading ** before
src, it will only match if the src folder
is at the "top level" of the zip. For example, the pattern won't match a file
like other/src/test/java/Foo.java, but it will match a file
like src/test/java/Foo.java.)
Input Content Identification Rules
Identification rules can be used to direct the attention of bundled tools to the correct sections of an uploaded zip file. For example, many projects will contain a mix of first- and third-party code, and without insider knowledge, there generally isn't a way for Software Risk Manager to know which is which.
One example of this is when uploading a .war file to be
analyzed. The typical internal structure of a .war file
includes many third-party libraries as .jar files, and often
the custom code (first-party) is compiled into another .jar
file and placed alongside the third-party .jars. In this case,
Software Risk Manager has no way to distinguish whether each individual
.jar file is first- or third-party, so it will typically
assume that all of them are first-party. This can lead to analysis tools
becoming overwhelmed and running out of memory and causing the analysis to fail,
or if the tool doesn't fail, it will have produced a large number of
unactionable results due to it analyzing code from those third-party
.jars.
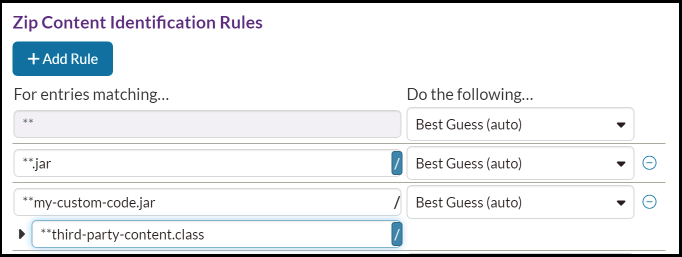
In the example below, a configuration has been made to address a particular case
like the one described above. It starts by assuming any
.jarfile is "Library Code", by combining the
**.jar pattern with the Mark as "Library Code"
decision. The next rule uses a more specific pattern to match a
my-custom-code.jar and identify it as "Custom Code". This
rule overrides the previous one because it comes after. Next, the user realized
that they had some third-party library classes embedded in their "custom code"
.jar file, so they configured a rule to mark those specific
files as "Library Code," This was done by first entering
**my-custom-code.jar as the pattern, then clicking the
/ button to add a nested pattern, then entering
**third-party-content.class as the nested pattern.

Schedule Analyses
You can set your project to schedule an analysis for its Tool Orchestration, Tool Connectors, and Git configurations. Scheduling intervals include hours and minutes, number of days with a specified time of day, and number of weeks with a specified day and time. Click the checkbox "Automatically run an analysis," then use the radio buttons to select how often to run the analysis. Click Save to keep your settings.
Using Tool Connectors with Analysis Scheduling
- From the Projects page, click a project's dropdown configuration icon and select Tool Connectors.
- The Tool Connectors window shows your existing tool connectors. Click the add icon (+) for each tool connector that you want to include in every analysis.
- Check Run this connector during normal analyses. This will let the tool connector run during an analysis.
